
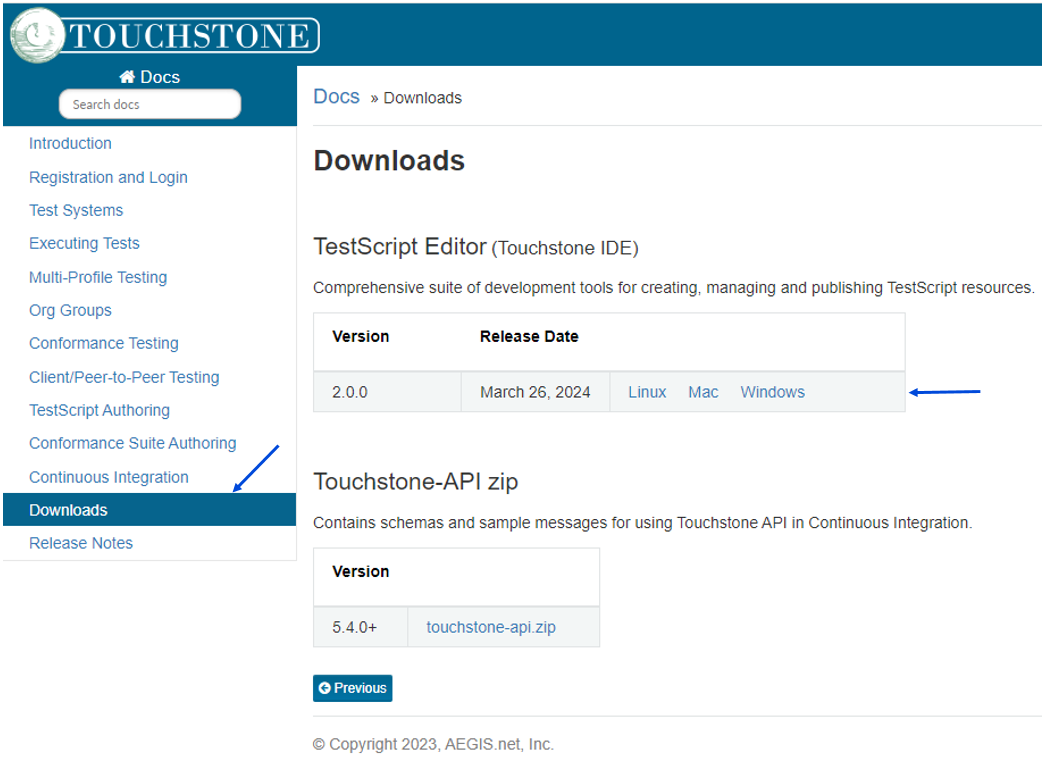
TestScript Editor
The TestScript Editor is an Eclipse-based desktop development environment. It provides a comprehensive suite of development tools for creating, managing and publishing FHIR TestScript resources. It is designed to simplify test script development and accommodate a large number of users, ranging from beginners to experts.
The TestScript Editor can be used to:
Upload Test Groups and TestScript resources to Touchstone.
Upload Test Groups to and download them from Simplifier.
Manage TestScript resources by integrating with Version Control systems such as SVN, GIT etc.
The TestScript Editor leverages the following built-in Eclipse editors:
XML Editor (*.xml)
JSON Editor (*.json)
Groovy Editor (*.groovy)
Text Editor (*.txt)
Java Editor (*.java)
Download
You can download the TestScript Editor by going to Docs > Downloads and selecting the appropriate platform:
Once the download is complete, unzip the zip file to a directory of your choice.
Start TestScript Editor
To bring up the TestScript Editor, run/open the Touchstone IDE file in the unzipped directory. It will be Touchstone IDE.exe on Windows, Touchstone IDE.app on Mac, and Touchstone IDE on Linux.
Feel free to create a shortcut to this file.
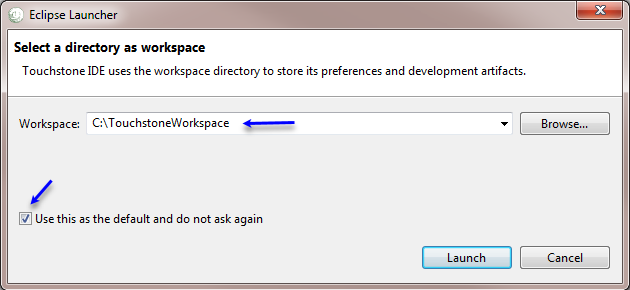
The first time, the editor is brought up, it will prompt you for the location of your workspace. You can select any location. The workspace location can be different from the location of your TestScript resources.
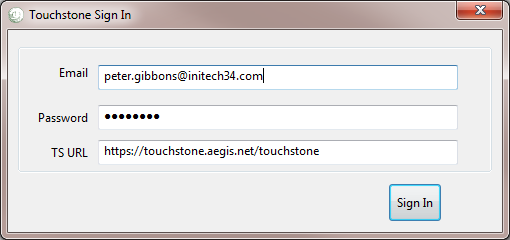
Use of TestScript Editor requires Enterprise-Level subscription. You must use the same credentials you use to sign into Touchstone web site:
Create TestScript Project
You can start by creating a simple project as follows:
From the menu bar, select
File > New > Project...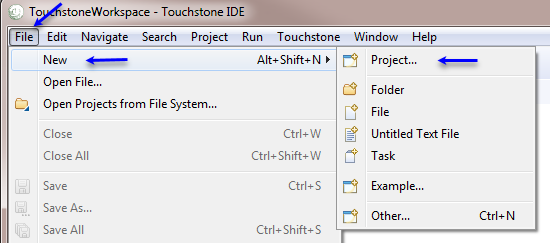
In the New Project wizard, select
General > Projectand click Next: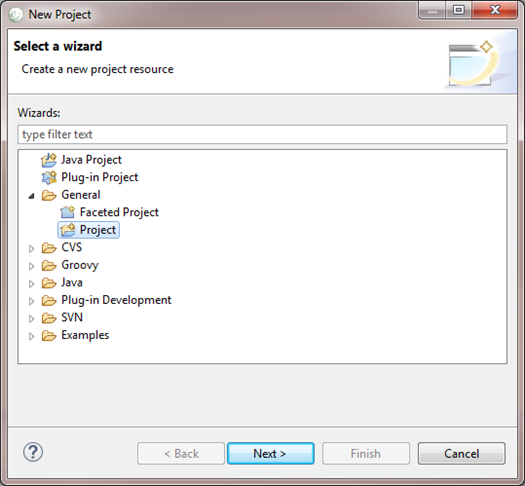
In the
Projectname field, type the name of your new project e.g. FHIRSandbox.Leave the box checked to use the default location or uncheck the default location and select a new location for your new project. Click
Finishwhen you are done.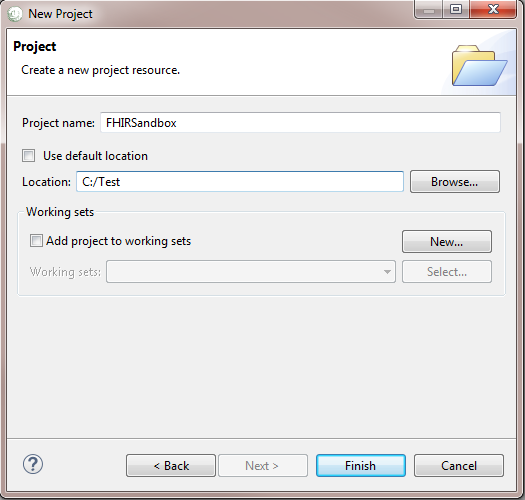
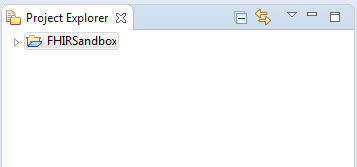
The navigation view will now contain the FHIRSandbox project you just created.
Create a Test Group
Test Groups in Touchstone are represented by folders in TestScript Editor. You can create a new folder using the Project Explorer view’s popup menu:
Activate the Project Explorer view and select the project FHIRSandbox (the first project we created in the Project Explorer view). Right click on FHIRSandbox folder and select
New > Folder.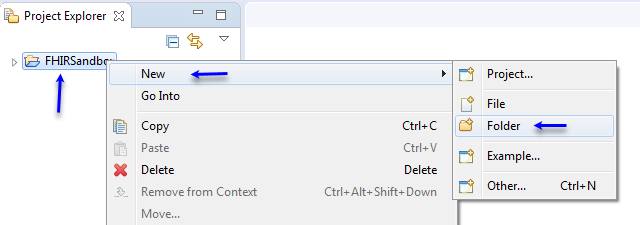
In the
Folder namefield, type a unique name for your new folder, e.g. Patient: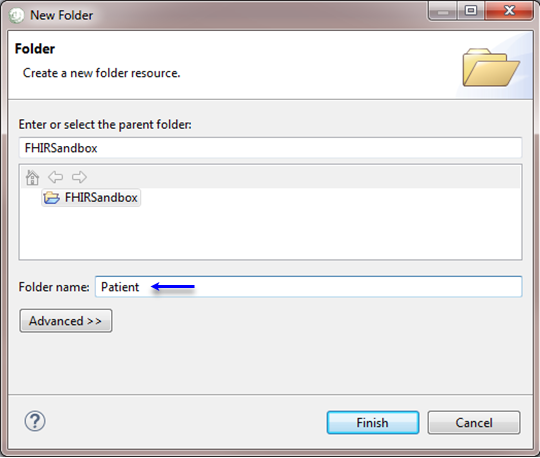
Click
Finishwhen you are done. The Project Explorer view will update to show your newly created folder: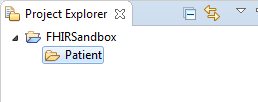
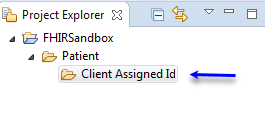
Repeat the folder creation steps. This time, create Client Assigned Id under the Patient folder:
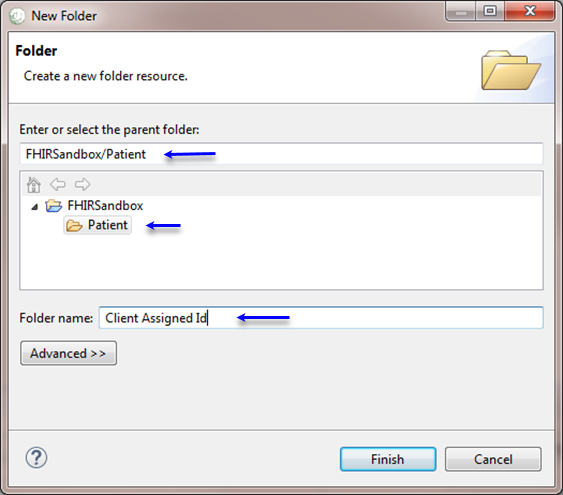
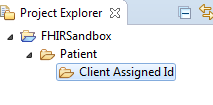
The Project Explorer view will update to show your newly created folder:
Create a TestScript
You can create a TestScript by following the steps below:
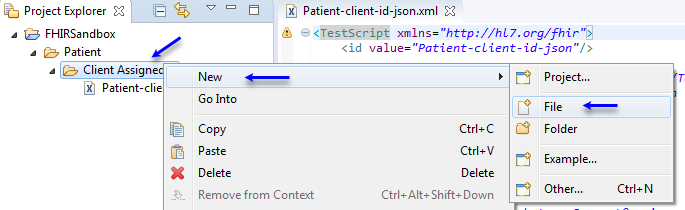
Select the folder Client Assigned Id in one of the navigation views.
In the toolbar, activate the drop-down menu on the New Wizard button
 and select
 File: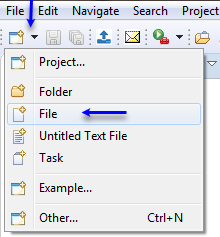
Enter the file name including the extension e.g. Patient-client-id-json.xml:
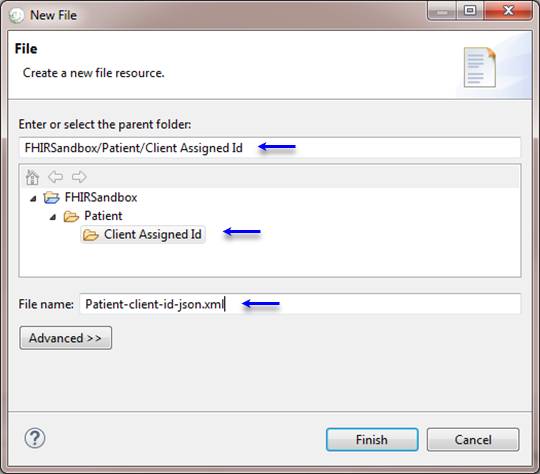
The file extension is “.xml” indicating that the source will be written in XML format.
The file name has “-json” indicating that the TestScript will be used to call REST operations in JSON format. You don’t have to follow this convention.
Click Finish when you are done.
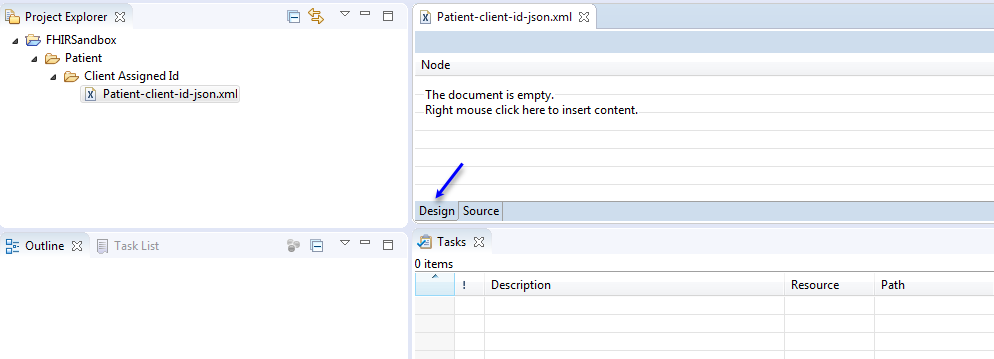
The Workbench has an editor capable of editing XML files. The editor is automatically opened on the newly created file:
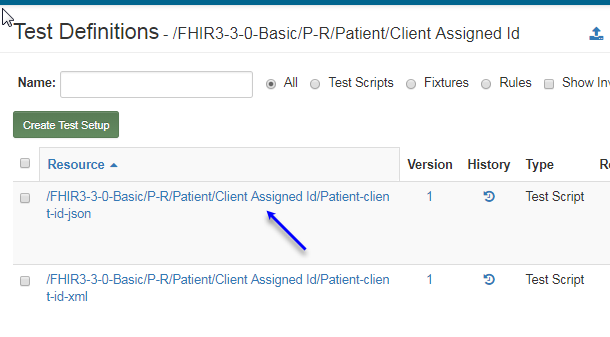
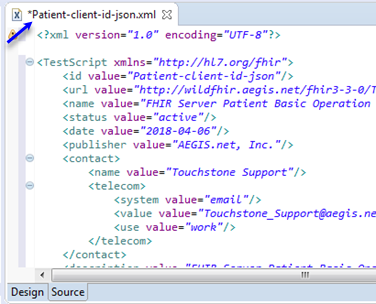
Select the
Sourcetab and copy into it the contents of the Patient test scripts. Current up-to-date scripts may be obtained from Test Definitions in Touchstone. You can download these example Patient test scripts and fixtures: Example Patient Test
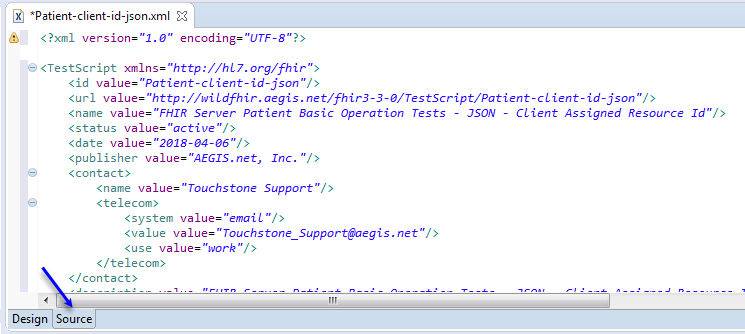
Notice that the editor tab has an asterisk (*) at the left of the filename. The asterisk indicates that the editor has unsaved changes.
In the Workbench window’s toolbar, click the Save button
 to save your work.
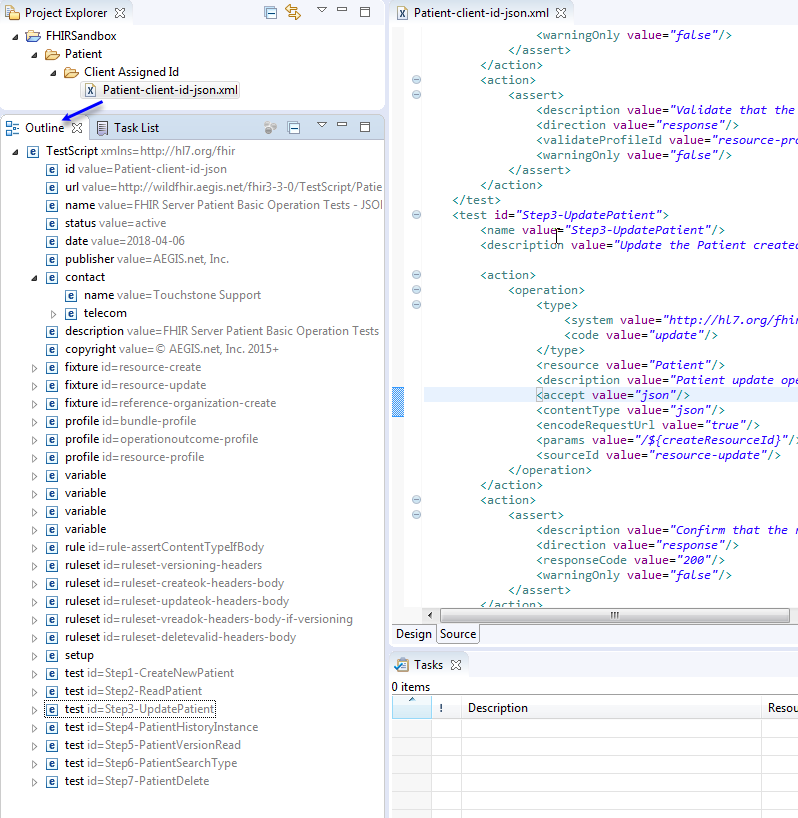
The Outline panel shows the high-level structure of the TestScript file:
Note that a new file can also be created by using the context menu which you can get to by right-clicking the folder:
Code Completion
The TestScript editor provides pre-defined easy-to-use XML templates which increase reusability and speed up development of test scripts.
To access the templates, open any XML file and enter CTRL + SPACE. This displays the predefined list of templates that you can select for code completion:
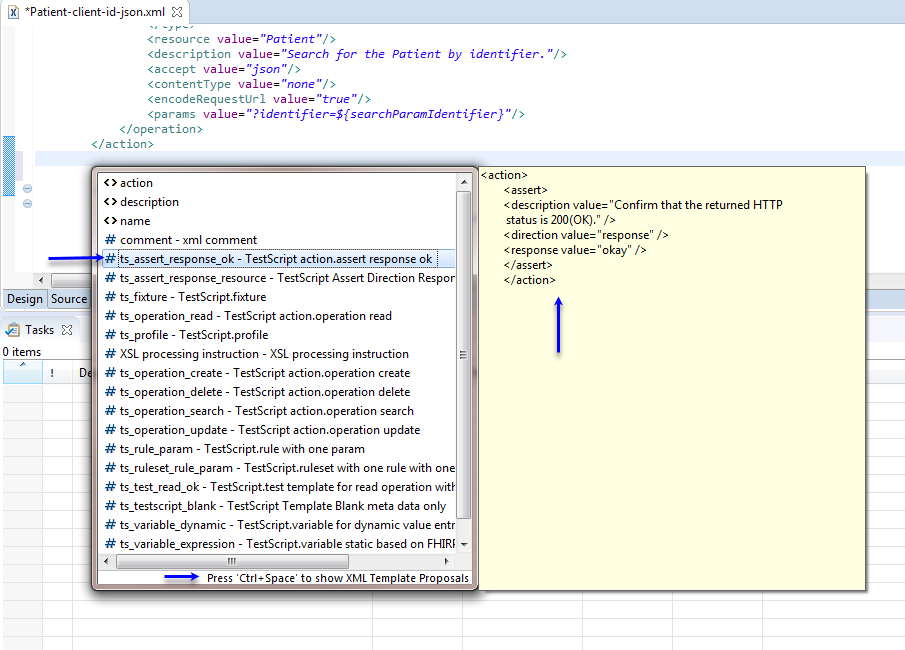
You can use the provided templates, customize them, or create your own templates.
For example, you can work on a group of testscripts that should all contain a rule/ruleset element with a specific definition. Create a template that contains the tags for that rule/ruleset, including the appropriate attributes and attribute values for each tag. You can copy and paste the tags from a structured text editor into the template’s Pattern field. Then select the name of the template from a content assist proposal list whenever you want to insert your custom rule/ruleset into an XML file.
To create a new XML template, you can take the following steps:
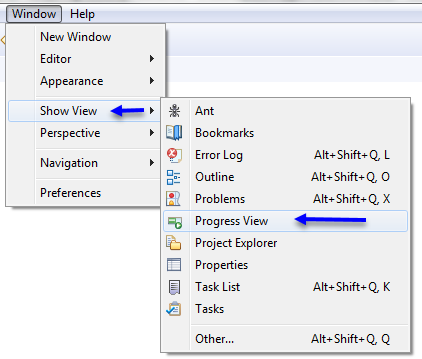
Click Window > Preferences and select XML > XML Files > Templates.
Click New if you want to create a completely new template.
Supply a new template Name and Description.
Specify the Context for the template. This is the context in which the template is available in the proposal list when content assist is requested.
Specify the Pattern for your template using the appropriate tags, attributes, or attribute values to be inserted by content assist.
If you want to insert a variable, click the Insert Variable button and select the variable to be inserted. For example, the date variable indicates the current date will be inserted.
Click OK and then Apply to save your changes.
You can edit, remove, import, or export a template by using the same preferences page. If you have modified a default template, you can restore it to its default value. You can also restore a removed template if you have not exited from the workbench since it was removed.
If you have a template that you do not want to remove but you no longer want it to appear in the content assist list, clear its check box in the table on the Templates preferences page.
Touchstone Integration
Note
You need to be connected to internet
You need Starter or higher subscription level to upload test scripts to Touchstone.
Upload to Touchstone
Upload to Touchstone can be initiated in one of the following ways:
1.1. Toolbar upload button - In the toolbar, click the upload icon
 button. The file or folder selected in the Project Explorer view will be uploaded.
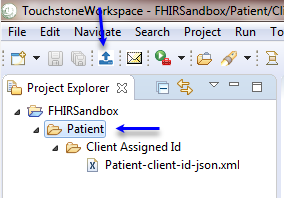
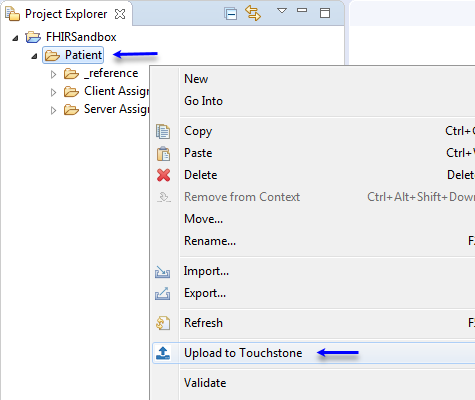
1.2. Popup menu - In Project Explorer, right-click a folder or file and click on Upload to Touchstone:
1.3. Touchstone menu - Click on Touchstone > Upload to Touchstone on the menu bar. The file or folder selected in the Project Explorer view will be uploaded.
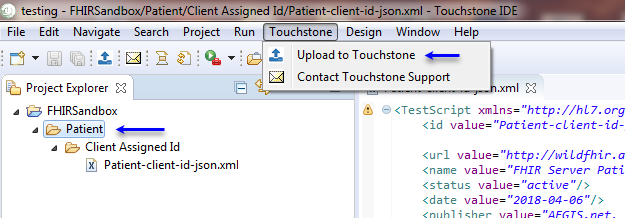
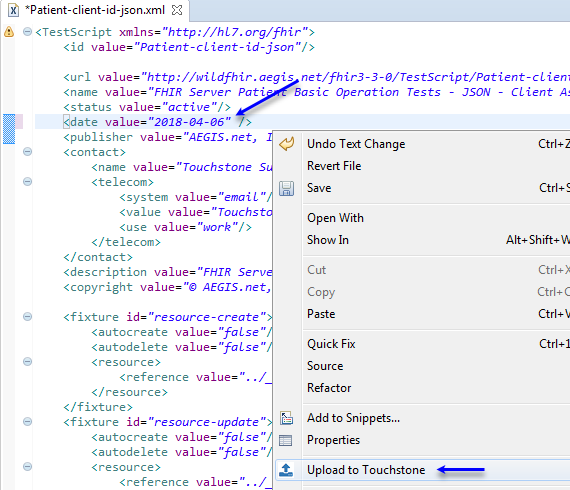
1.4. Editor popup menu - In the editor, right-click the content pane and click on Upload to Touchstone:
Warning
You should upload the root folder first before attempting to upload sub-folders and files.
Notice the absence of
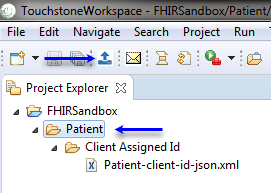
Patientfolder in FHIRSandbox in Touchstone UI: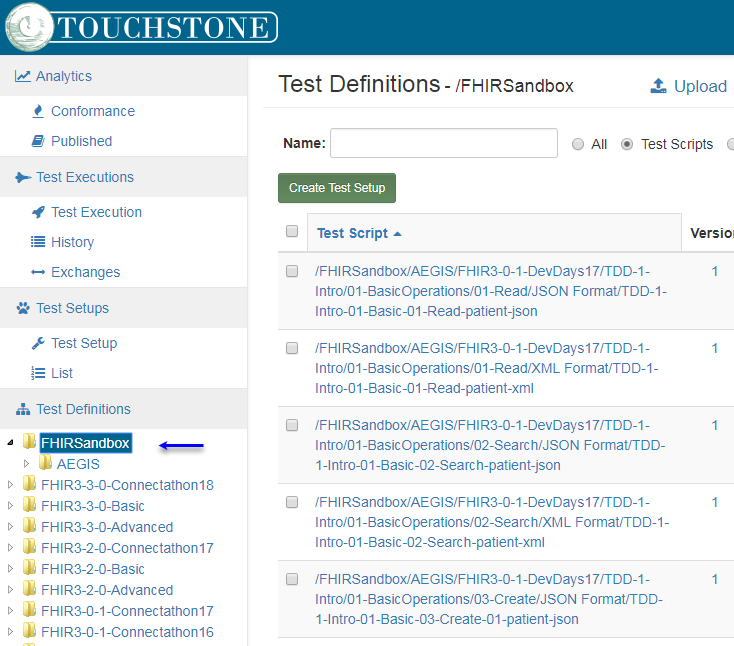
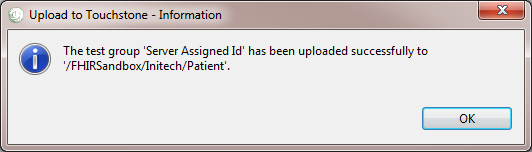
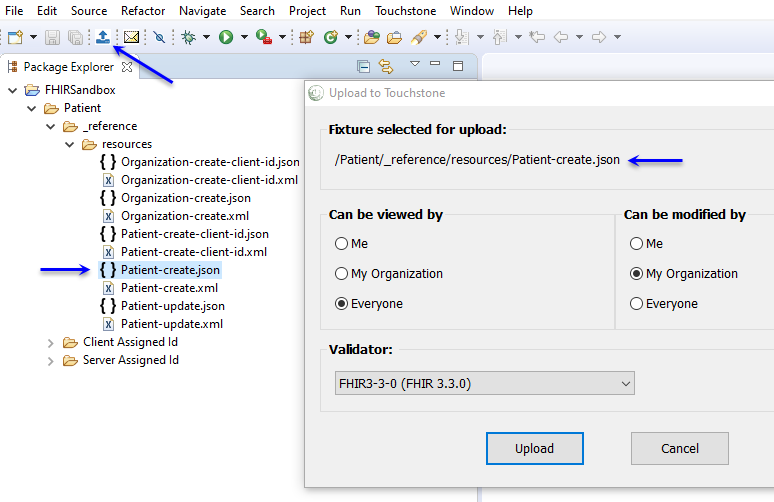
Select the Patient folder and click on the Upload icon:
Select the View/Modify options and click the Upload button to submit or Cancel to cancel the request.
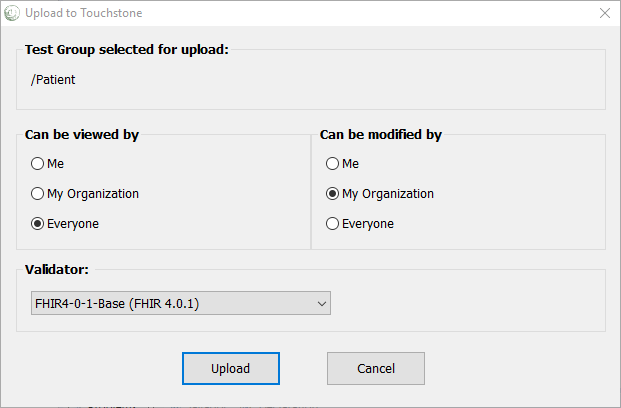
The
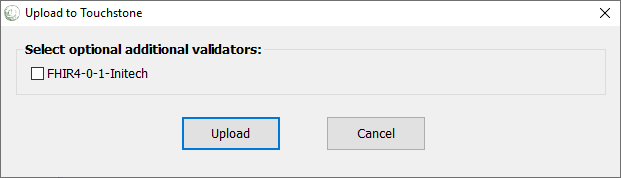
Can be viewed byandCan be modified byoptions are explained in Upload Destination and Test Definition access.If the validator you selected has any additional validators linked to it, you will be prompted with another window where you can optionally choose to select zero or more validators to upload along with. If Upload is selected, the upload will run in the background:
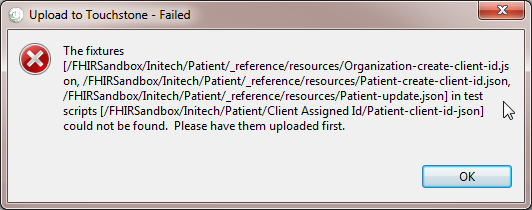
You will get an error from the server stating that all dependent fixtures were not included as part of the upload. Fixtures referred to by this test script should already exist in Touchstone or should be included as part of the upload.
Current up-to-date scripts may be obtained from Test Definitions in Touchstone. You can download these example
Patienttest scripts and fixtures: Example Patient Test
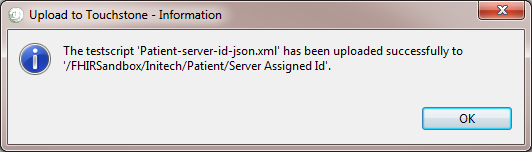
This time when we upload the
Patientfolder, the upload succeeds:
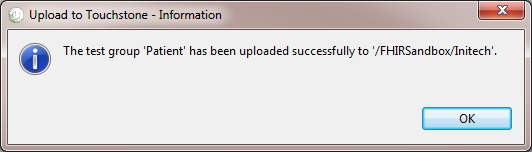
Notice that the test group
Patientlands under the name of the organization the user belongs to: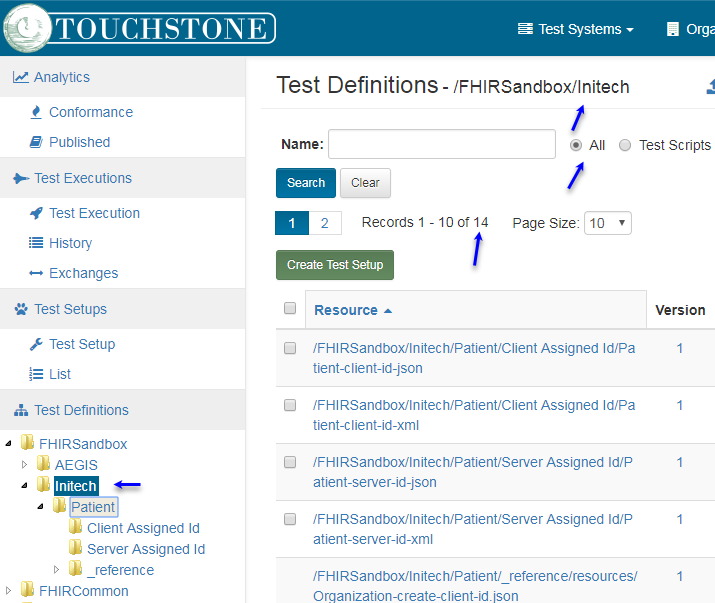
Now that the root folder (
Patient) has been uploaded to Touchstone, you can make changes and create/upload individual folders within any level of the hierarchy: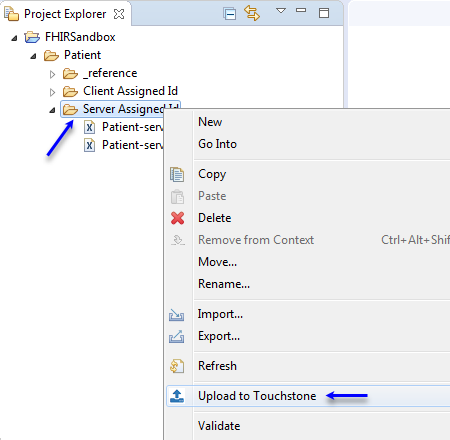
You can also upload changes to individual test scripts and create new test scripts:
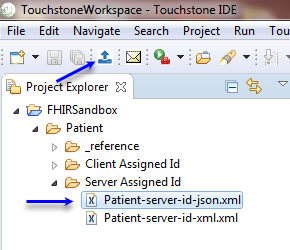
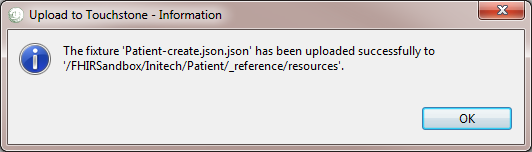
You can do the same with individual fixtures:
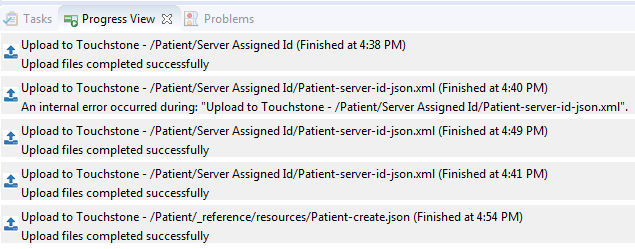
You can see the history of completed upload jobs in progress view:
Simplifier Integration
Simplifier Preferences
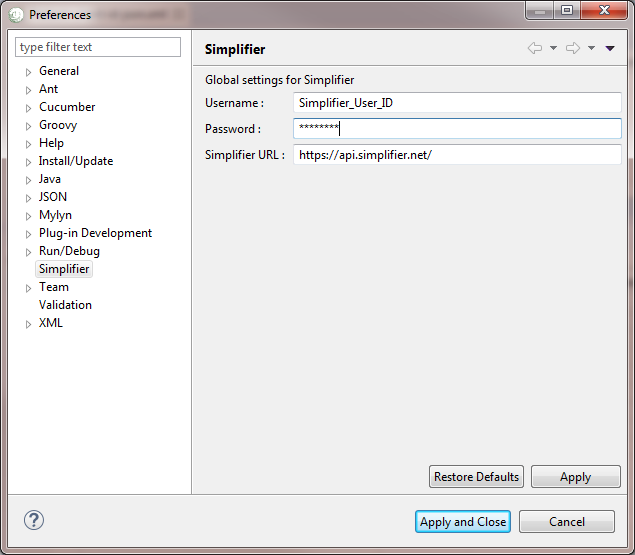
To upload or download files you need to configure the Simplifier user credentials in preferences page Windows -> Preferences -> Simplifier
Enter your Simplifier user credentials and click Apply and Close button to save the preferences. This will be used to authenticate and authorize the requests in Simplifier.
Create New Project
Start by creating a simple project as follows:
From the menu bar, select
File > New > Project...
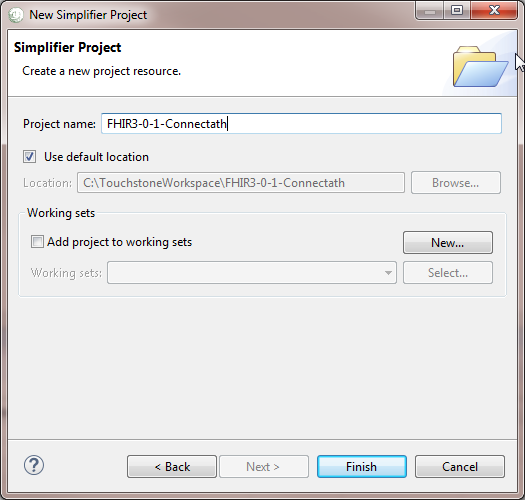
In the New Project wizard, select
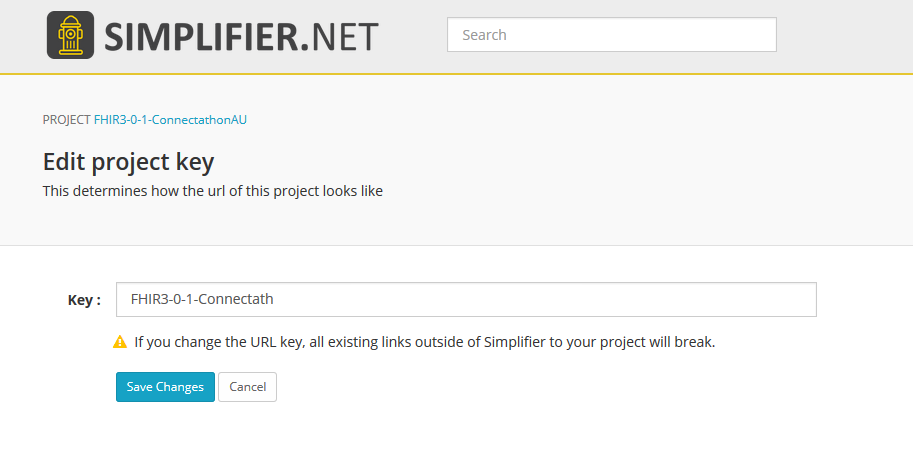
General > Projectthen click Next.In the Project name field, enter the Simplifier Project key as the name of your new project e.g. FHIR3-0-1-Connectath. The Simplifier project key can be found in Simplifier account page
Settings > Project URL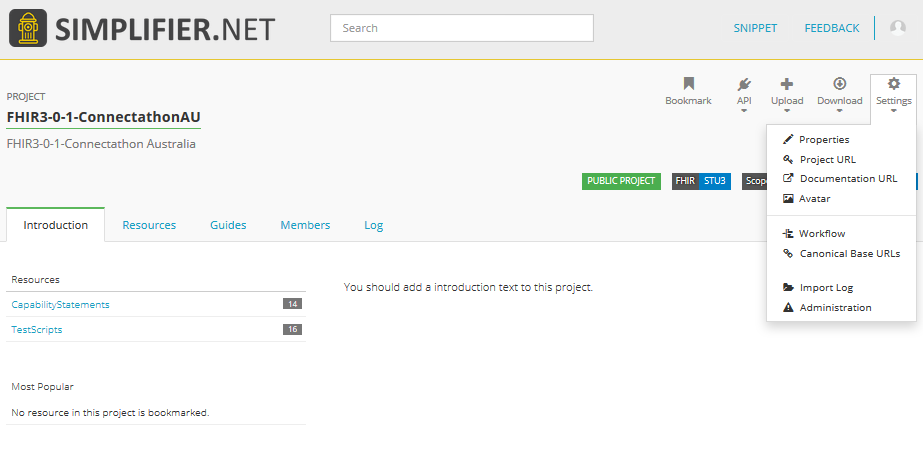
Leave the box checked to use the default location for your new project. Click Finish when you are done.
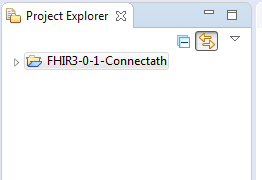
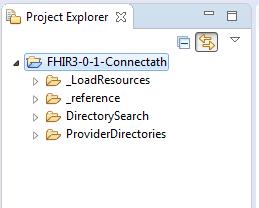
In the navigation view, you will see the FHIR3-0-1-Connectath project we just created.
Note
You need to be connected to internet
You need to have a Simplifier account with active projects.
You need to configure the Simplifier user credentials in the editor before uploading or downloading files from Simplifier.
Download from Simplifier
In the Project Explorer view select the new project
FHIR3-0-1-Connectath > Right Click > Simplifier > Download from Simplifier. If authentication is successful the files will be downloaded from Simplifier:
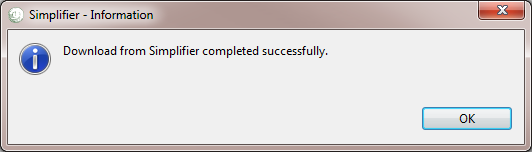
Refresh project FHIR3-0-1-Connectath and you should be able to see the downloaded files
Upload to Simplifier
In the Project Explorer view select the new project
FHIR3-0-1-Connectath > Right Click > Simplifier > Upload to Simplifier. The confirmation dialog window is displayed: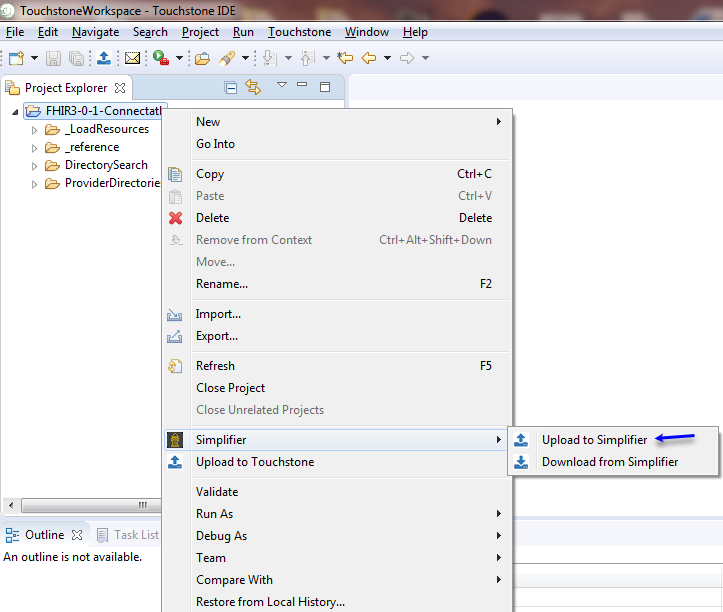
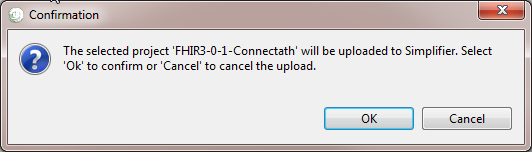
Select Ok to submit or Cancel to cancel the upload process.
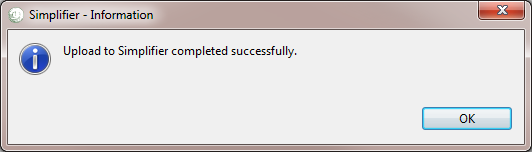
If authentication is successful the files are uploaded to Simplifier project.
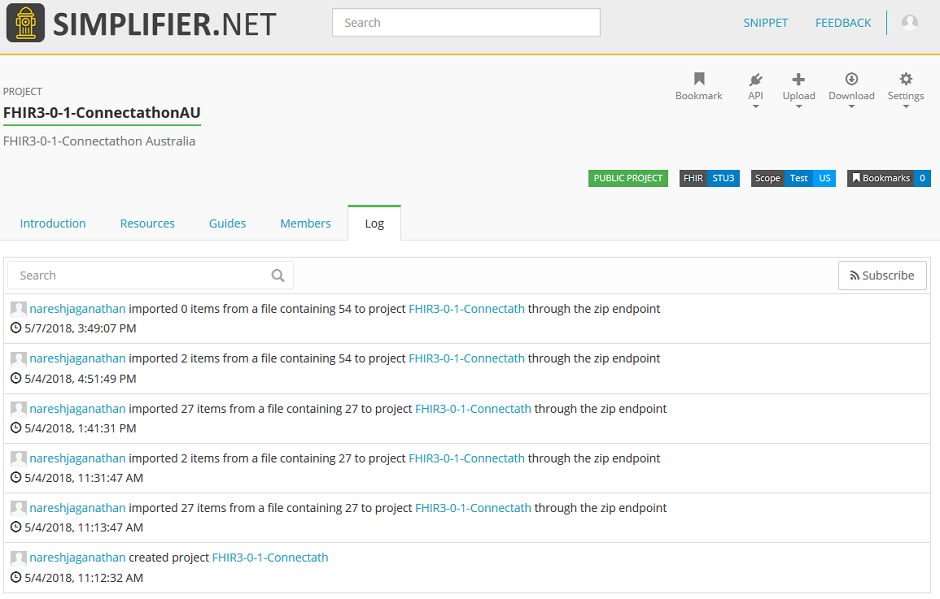
You can verify the uploads on the Log tab in Simplifier as shown below.
Updating TestScript Editor
You can update the TestScript Editor as follows:
1. Check for Updates: (Recommended)
To check to see whether there are updates for the TestScript Editor in your system (requires Internet access):
Click command link
Help > Check for Updatesor by clicking the Updates Available notification shown below. The notification is displayed when new updates are available on startup and reminds the user every 4 hours if not updated.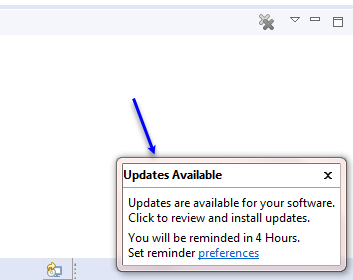
This will contact the Web sites defined in your Available Software Sites preferences to look for upgrades. If upgrades are available, they will be presented in the Available Updates wizard as shown below.
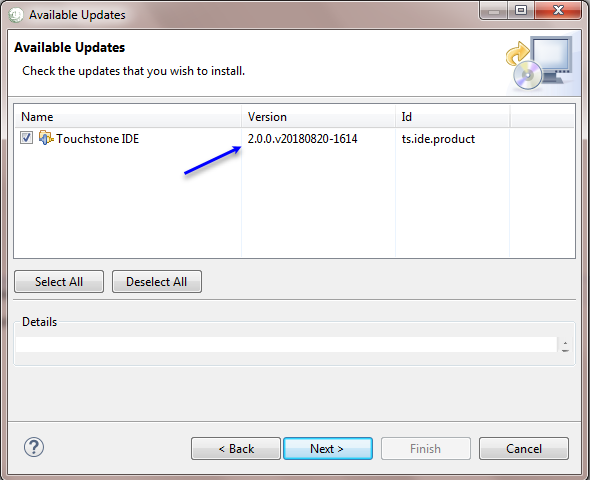
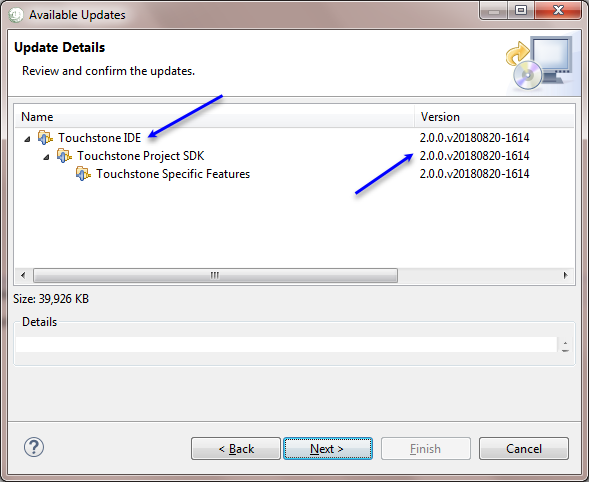
Check the updates that you wish to install. Click Next to see the details of the updates available as shown below.
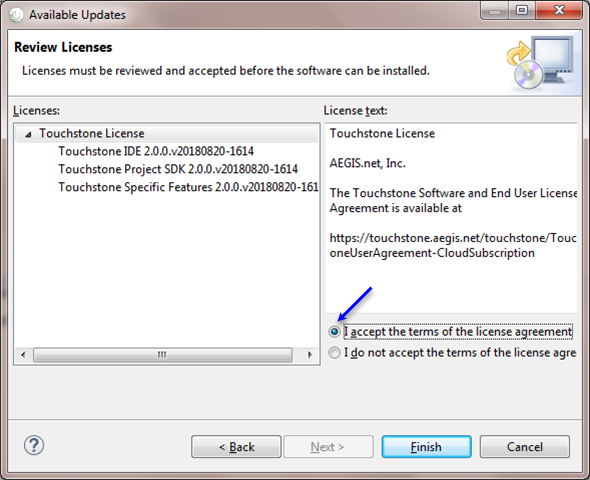
Click Next to review the license for selected items. If the terms of all these licenses are acceptable, check “I accept the terms in the license agreements and click Finish to install the updates.
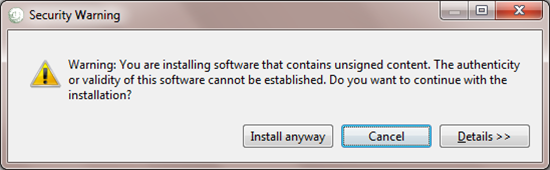
Since TestScript Editor updates are not digitally signed the security warning dialog will be displayed. Click Install Anyway to continue the installation.
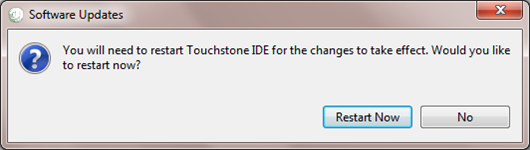
Once the updates are installed successfully, you will be prompted to restart the workbench. Click ‘Restart Now’ to restart the Workbench for the changes to take effect.
- 2. Using the Install New Software Wizard
The Install New Software Wizard allows you to add new or update software to your installation. To install new or update an existing software:
Click
Help > Install New Software.... This wizard shows you the items that are available for installation.Select the TestScript Editor update site using the Works With combo at the top of the page. By default the items in the site are grouped by category and the latest version of each item is shown.
As you browse the available software, you can check the items that you wish to install.
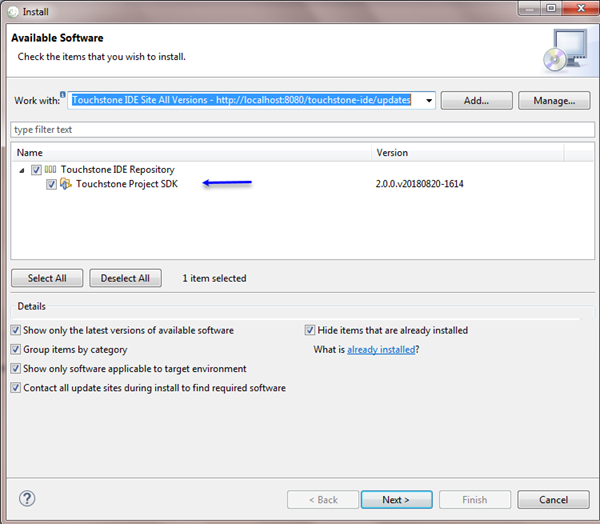
When you have finished making your selections, click Next to install the checked items. If the items you are installing require other software items in order to operate, those requirements will be included in your request. A checkbox at the bottom of this page controls whether all software sites will contacted when looking for requirements, or only the site shown in the Work With combo box.
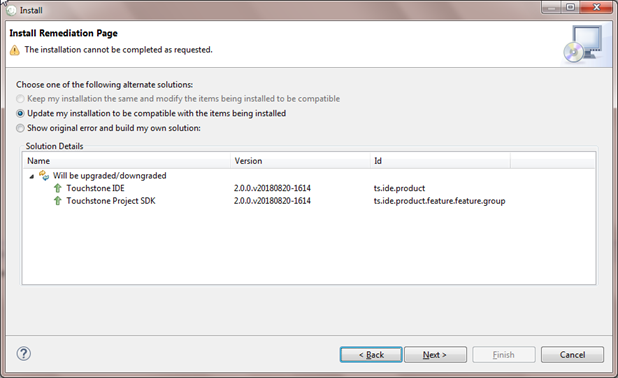
Once you click Next, the wizard will validate your selections against your installed software, and may display the ‘Install Remediation page’ if the items selected are already installed. Select Update my installation to be compatible with the items to be installed and click Next.
If all of the requirements are available and there are no other installation conflicts, clicking Next will show the Install Details page. The items to be installed will be listed. Expanding each item will show what additional items will be required to complete the install. You will see an estimated size of the installation at the bottom of the page.

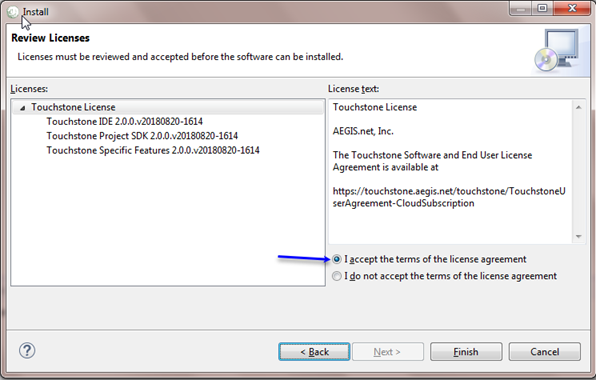
If the selected items have license agreements to be reviewed, you must click Next. Carefully review the license agreements for the items you wish to install. If the terms of all these licenses are acceptable, check “I accept the terms in the license agreements.” Do not proceed to download the features if the license terms are not acceptable.
- If the license agreements are acceptable, click Finish. This will begin the download and installation of the new software.
Since TestScript Editor updates are not digitally signed the security warning dialog will be displayed. Click Install Anyway to continue the installation.
Once the updates are installed successfully, you will be prompted to restart the workbench. Click ‘Restart Now’ to restart the Workbench for the changes to take effect.